User’s Manual for ApplyLeads v. 3.2
For Unix and Windows
ApplyLeads 3.2 Email List Manager
Copyright 2001-2004 ApplyMarketing.com
All Rights Reserved
To purchase or view a live demo visit http://www.applytools.com/applyLeads.html .
How to use this manual:
This
document has been designed as a reference for users of ApplyLeads, whether
installing or troubleshooting. You may click on the quick links below to jump
to a section. Professional users can contact us at any time for
assistance in installing or troubleshooting.
NOTE: You may also refer to the
“INSTALL.doc” file that was bundled with the distribution for complete
installation instructions.
Viewing E-mail Replies
to your outgoing newsletters
Viewing and searching
your subscriber directory
Adding a single member
to your list
Adding multiple members
to your list at once
Removing a single member
from your list
Removing multiple
members from your list
Banning and un-banning
members from your list
Editing your software/hardware
configuration and preferences
Setting your demographic
questions
Viewing your statistical
reporting feature
Resetting your
statistical data
Getting your
signup-page code to put into your web pages
Getting your
unsubscribe-page code to put into your web pages
Downloading your subscriber/unsubscriber
lists to your desktop
Exporting your data to
Microsoft Excelä
Changing Your
administrative password
Importing data from an
external file into ApplyLeads
Backing up your data to
a safe place
Printing the contents
of the current page
Contribute your
suggestions for future improvements
Glossary
of Terms
ApplyLeads v3.2
The
product name of this email list manager.
Email List Manager
A
permission based marketing tool. A
software product or service that allows the user to manage opt-in email lists
from one central location. Members
typically opt-in through a website and the administrator may later contact
these opt-in members by publishing newsletter announcements from the manager to
the entire list of opt-in members. The
email list manager provides functionality to maintain a clean updated list of
qualified opt-in members.
Opt-in
Typically
placed at the end of an internet form, the process where by a website visitor
voluntarily clicks on a box to join an email list. The subscribe box is defaulted to unchecked and the visitor must
perform an action to join.
Opt-out
Typically
placed at the end of an internet form, the process where by the website visitor
is defaulted to subscribe to the list.
The
subscribe box is defaulted to checked and the visitor must uncheck the box in order not to join the list.
Subscribers (Net Subscribers)
In
ApplyLeads this always apply to “Total Net Subscribers” which is the total
number of subscribers minus total unsubscribers. The formula is calculated as
follows:
“Total Net
Subscribers = (Total Subscribers) – (Total Unsubscribers)”
Unsubscribers
In
ApplyLeads, unsubscribers always refers to the total number of members who are
removed from the list, through both the unsubscribe function and by the
administrator. The formula is
calculated as follows:
“Total Unsubscribers = (Total Subscribers) – (Total
Net Subscribers)”
or
“Total Unsubscribers = (Total Subscribers) – [(Total
Subscribers) – (Total Unsubscribers)]”
Total Subscribers
In
ApplyLeads total subscribers always refers to the total number of members who
have joined the list since inception.
This total includes all members who were later removed or unsubscribed.
The formula is calculated as follows:
“Total Subscribers = (Total Net Subscribers)
+ (Total Unsubscribers)”
or
“Total Subscribers = [(Total Subscribers) – (Total
Unsubscribers)] + (Total Unsubscribers)”
Attrition Rate
This
is the percentage of members in the list who drop out, as compared to the total
number of subscribers. The formula is
calculated as follows:
“Attrition Rate = [(Total Unsubscribers) / (Total Subscribers)] x 100”
Retention Rate
Retention
rate is defined as the percentage of members who stay with your list and do not
unsubscribe from the list. The formula is calculated as follows:
Retention Rate = “[(Total Net Subscribers / Total Subscribers)] x 100”
or
“Retention Rate = 100 - Attrition Rate”
Dedicated Server
A
server that is used entirely for your website address and is not shared with
other sites.
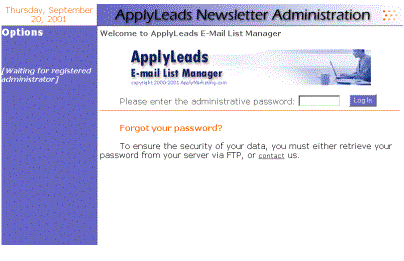
The
log in page is where the email administrator enters their password to log into
ApplyLeads email list manager. If you have
forgotten your password and you are familiar with perl you may go into the
script and retrieve it, if you are not familiar with perl you must contact us
at http://www.ApplyTools.com.
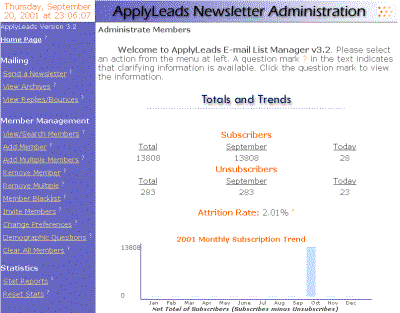
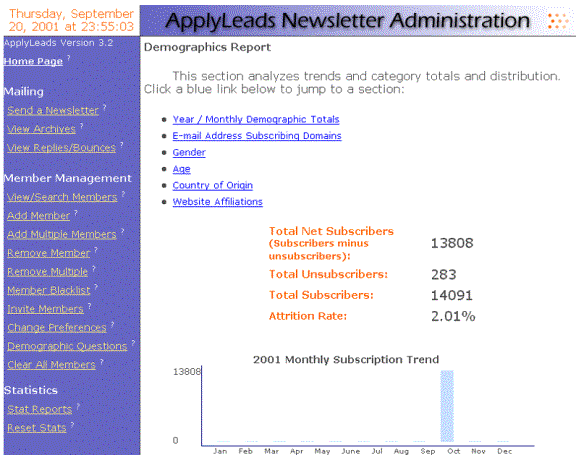
After
you have logged into ApplyLeads, the home page welcomes you with Totals and
Trends about your e-mail subscribers.
Total net subscribers on shown on the home page since inception, this
month and today.
Right
below, total unsubscribers on shown on the home page since inception, this
month and today.
A
graph of total net subscribers for the current year is shown to present a
graphical representation of the data.
The
attrition rate, or drop out rate is also show to provide a quick glimpse of the
percentage of members who leave the list.
System
Information is also provided by listing today’s date, the date of your last
back up, and the date of the last log in.
The
top left of the screen shows the date and time for which your server is
set. This time is generated based on
the physical location of the server that is hosting ApplyLeads.
At
all times you may look at the bottom left hand corner of your browser to view
total subscribers and the current date.
To
the left are your navigational options to help you administrator and manager
your list. At any point you may click
on the ? that appears next to specific sections
in ApplyLeads which provide a summary about that section.
Mailing
Send
A Newsletter
The
“Send A Newsletter” section is the
area in which you will spend the majority of your time in ApplyLeads. Here you
will take advantage of the robust sending capabilities available. You will
create, preview, test, target, and send your newsletter or announcement. Before
you broadcast a newsletter to your members, you may want to customize your
layout. Much of this customization is
done is the “Change Preferences” Section.
![]()
Applyleads is capable of sending up to 100,000 e-mails safely and
quickly. Sending thousands of e-mails
is a resource intensive process, however, and for those of you who rent server
space from a Web host, you should first check with your Web host to determine
if they have limited the number of e-mails which can be sent through their
server at once. In general, your Web host might complain if you send out 10,000
e-mails every day, but smaller newsletter will usually pass by unnoticed.
Customizing your
Newsletter Layout
All
of your layout customization will be done in the “Change Preferences”
section. The following mail attributes are set in that section:
1. Return email address
2. Subject line
3. Header text
4. Footer text
5. Unsubscribe information and One-Click Unsubscribe
feature
6. Refer-a-Friend viral component
7. Send e-mails as text or html
Once these preferences have been set and saved,
they will remain in effect until you change them.

In choosing whether to send your e-mails
as plain text or HTML code, there are some things to keep in mind. Let’s review
some of the strengths and weaknesses of either format:
HTML Mail
Pros:
1. Allows images for a lush, visual display in newsletters
2. Allows creativity in type fonts, colors and sizes
3. Allows dynamic content, including Java Script and Vbscript
4.
Allows advanced formatting capabilities with
Cascading Style Sheets
5.
Best for entertainment, or otherwise informal
news lists
Cons:
1. Not compatible with all e-mail clients, may display as gibberish
2. HTML links may load improperly for some users
3. Images may take very long to load for users with low bandwidth
4. Many people distrust HTML mail because it can contain viruses
5.
HTML mail is considered improper for
professional e-mailings.
Plain Text Mail
Pros:
1. Compatibility in all e-mail clients ensures display predictability
2. Generally immune from viruses and trojan horses
3. Loads fast in all e-mail clients
4. Considered the de facto standard for professional correspondence
Cons:
1. Lacks style, all mail defaults to system font type, color and size
2.
Does not support images, advanced formatting or
scripting
In general, professional e-mails are
only sent in plain-text format, while entertainment-oriented e-mails are sent,
occasionally, in HTML format. You must decide which format best suits you.
![]()
Before ever sending an e-mail to a
subscriber, use the Preview Message and Send Test Message
functions to test different combinations of settings, to produce the e-mail
display that most fits your subscribership.
And remember that different e-mail
clients display e-mail differently, and have different capabilities. What looks
great in one might look terrible in another.
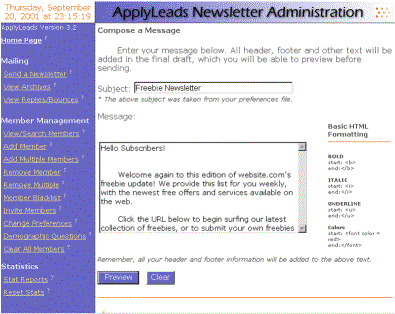
Composing your Mail
Once
you are comfortable with your layout preferences, you may enter your newsletter
body text in the first box that appears after selecting “Send A Newsletter”. There is no limit to
the message size you may compose.
Once
you have entered your message in the text box (in either text or html code,
depending on your preference settings), click the “Preview” button to move to
the next screen, a screen shot of which is below:
Previewing your Message
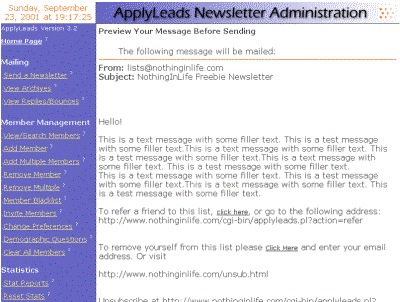
This
section displays your message as it will appear in outgoing e-mails, so there
are no surprises. It automatically fills in all your header, footer, and other
information that will go out with your mails. Once you have looked over the
message, you may now click “Send” to actually send out the messages to your
subscribership. Or, you may take advantage of any of the other features
available, listed below.
Sending Targeted E-mail
Targeted
mail means sending e-mail only to segments of your list, depending on the
characteristics of that segment. For example, you can select to target only
persons 50 years of age or older, meaning that the program will only send the
current message to subscribers 50 years of age or older.
Let’s
say you run a family newsletter that appeals to both mothers and fathers. You
have a special offer you’d like to announce in your newsletter. The special
offer is for a Father’s Day sale that is happening at your store. Ideally,
you’d like to only send this announcement to the women subscribers on your
list, so they will be able to surprise their husbands with your products. This
is simple to do with ApplyLeads. The screen shot below shows how you would
accomplish this:
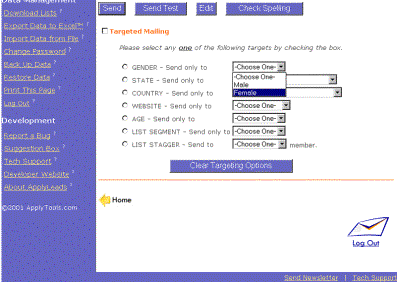
Simply
click the “Targeted Mailing” checkbox to enable target mailing. At this point,
ApplyLeads expects you to now select a category to target. Since you want to
just send to females in this case, you select “Female” from the Gender
drop-down menu. Now, when you click “Send” above, your mail will only be sent
to the females on your list.
If
you decide to disable targeted mailing (and send mail to everyone on your
list), just empty the “Targeted Mailing” checkbox. When you receive your “Sent
Message Report” via e-mail later, it will note your demographic target.
![]()
You must be collecting full demographic information in order to
target by demographic segment. Any members on your list who have not indicated
the relevant demographic information (e.g., male or female) will not
receive the e-mail.
Sending a Test E-mail
You may also send a test e-mail of your current message to
yourself, the administrator e-mail address in the Set Preferences
section. This e-mail will appear exactly as your members will see it. Use this
section to ensure the quality of your e-mails.
Spell Checking your Message
You may check the spelling of your message by clicking the button
“Check Spelling”. Here, the software will check the body of your message text
against your user dictionary. The spell checker will prompt you to either correct
words, or add them to your personal dictionary. Words you add to your
dictionary will be recognized in the future as correct.
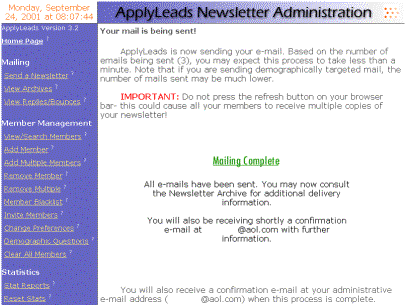
Sending the Mail
Once you have clicked “Send”, and confirmed that you wish to send the mail, a new screen will load as depicted below. A graph will appear, indicating the progress of the mailing. Once the green bar has grown to it’s full width, you will see a graphic which says “Mailing Complete”. Note that if you are only sending a few emails out, you may never even see the graph— the e-mails were sent before the graph could be loaded.
![]()
Never press Refresh on your browser while ApplyLeads is
sending mail! This could cause multiple copies of your newsletter to be sent
out to each of your members! If the graph appears to lock up, press the
“Update” button below the graph to get it moving again.
While ApplyLeads is sending the mail, you are free to do other work on ApplyLeads or elsewhere on your computer, and the mailing will not be interrupted. However, never start a new mailing until the last mailing has completed.
For those of you who run your own servers, keep in mind that the
mail sending process will be running in the background until the mailing is
complete, so do not kill any unfamiliar processes, as they may well be
ApplyLeads working. You can view the ApplyLeads mailing process with the ps
command in UNIX.
If, while you are sending mail, there is some interruption to your desktop computer (e.g., the power in the house goes out, or you accidentally unplug the computer), the mail will still be sent out normally.
Message Management
You know your mail has been sent when the “Mailing Completed” graphic appears on the Send page. If you have already closed that page while the mailing was still going on, there are two other ways to get information about the mailing:
1. Sent Message Report
2. Message Archive
Sent Message Report
When ApplyLeads is finished sending your mail, it will let you know by sending you a “Sent Message Report”. This is depicted below:
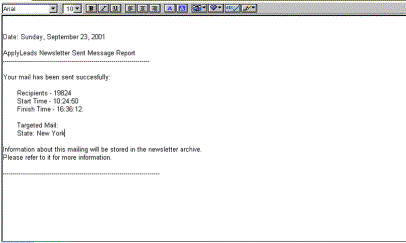
This e-mail gives you various information about the previous mailing:
1. Number of Recipients
2. Start Time
3. Finish Time
4. Demographic Target, if any
The “Sent Message Report” is sent to the administrative e-mail address listed in the Set Preferences section.

You should make great efforts to keep your list legitimitely opt-in. That is, never include people onto your list who didn’t actively select to be on the list. Also, make opting-out (giving your subscribers an easy way out of the list) simple for your members. This isn’t simply good moral advice, it’s good business advice—you can get into serious trouble for spamming—sending e-mail to people who did not actively request to be on your list. As of this writing, US congress is debating whether to enact law that will establish criminal and civil penalties for sending spam. It is up to you (refer to the ApplyLeads License) to be sure that you follow the guidelines for proper e-mailing.
Luckily, ApplyLeads makes ensuring a spam-free list easy. Our double-opt in feature guarantees that all subscribing members are authentic. Our One-Click Unsubscribe makes it a snap for an unhappy member to leave your list. And the E-Mail Replies function lets you unsubscribe members who reply directly to your newsletter e-mail address, trying to unsubscribe. Again, it’s up to you, but the price of spamming can be high, and the reward is generally very low. Take our advice and don’t do it.
Message Archive
The message archive contains every message you have
ever sent. See the section in this document (below) on the message archive for
more information.
View Archives

This
section was created so that you could retain a historical record of the
newsletters you have sent out in the past. In the large view, you will see the
following information:
View: Allows
you to view additional detail about the archived message listed.
Remove: Allows
you to delete the archive from the list
(You will be prompted to confirm your request to remove that archive).
Recipients: The total
number of members that received that particular message.
Date: The month, day, year as well as the time in which
the message was completed.
Subject: The
subject of the newsletter that was sent out.
Viewing Message Details
In
order to view details about the archived message which was sent you may click
on “View” to retrieve the following
information:
Date: The month, day, year as well as the time in which
the message was completed.
Title: The subject line of your message.
Recipients: The total number of subscribers who received this
message.
Start Time: The time the email was started
Finish Time: The time at which your server had completed the
mailing the massage to your members.
Message Header: The text which you had inserted as the header of
the newsletter (this typically may include an advertisement from you, or a
general message).
Message Body: The body text of the newsletter.
Message Footer: The text which you had inserted as the footer of
the newsletter (this typically may
include an advertisement from you or a general message, as well as refer a
friend functionality)
Unsubscribe instructions: (Bill
currently this is not showing up in the archive) The URL or email you would
like your member to use in order to unsubscribe.
It
is highly recommended that you add clear unsubscribe instructions with each
broadcast email.
View Replies and Bounces
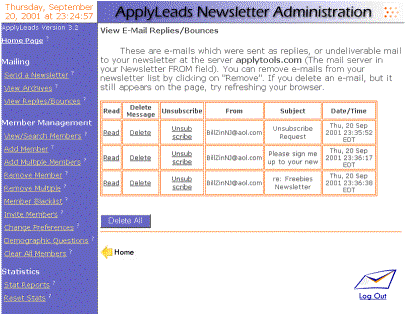
This
section of ApplyLeads will depend on some settings and installed modules to
properly display the emails. In order to ensure the proper function of this
section please complete the following steps.
![]()
ApplyLeads does not require the Net::POP3 module to SEND emails,
only to RECEIVE emails.
Step 1. Go to “Change
Preferences” section and enter an email address and email password in all
sections that require an email. It is highly recommended that you create a
special account just for bounce backs and replies. The number of messages may become overwhelming.
Step 2. Verify that you
have the Net::POP3 module properly
installed on your server. You may do this
simply by clicking on the section “View
Bounces/Relies” . If you do not
receive an error then your server most likely has the module installed. Installing this module is not something you
may do unless you are running your own server or a dedicated server and have
root or administrator access to the webserver.
If you are running on a shared host you will need to contact your
hosting company and request an install of the NET::POP3 Module for your
account.
Step 3. Test your bounce
back reply functionality by sending an email to the email address you specified
in the “Change Preferences” Section.
This section of ApplyLeads
works like an actual web based email.
You have the ability to view, open, read and delete messages that are
sent back to you from your subscribers.
This section allows you to unsubscribe a member directly from this
section without having to navigate between
“Remove Member” and “View Bounces/Replies”
![]()
Because
you are directly connected to your email account, if you delete all messages in
ApplyLeads it will delete all messages in your actual email account and
vice-versa.
Below is a description of
the sections.
Read : Allows you to read the email message
Delete Message : Allows you to delete the email message
Unsubscribe : Allows you to remove “unsubscribe” the member directly from this
section. This will count towards your
unsubscribed number and will indicate “removed by admin”
From :
the email or name the message is from
Subject :
the subject of the email
Date/Time:
the day, month, year and time the email was received.
There is also a delete all
button which allows you to delete all email messages from this account.
![]()
Because you are directly connected to your
email account, if you delete all messages in ApplyLeads it will delete all
messages in your actual email account and vice-versa.
Member
Management
View/Search Members
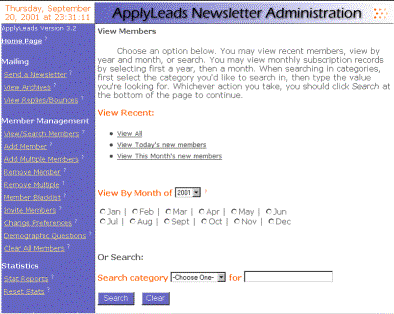
One
day you may have to locate an individual member in a list of thousands, or list
all members from a certain country. This section allows you to do that, by
searching your subscriber records in three different ways:
View Recent- Allows the administrator to view total, today’s,
and this month’s members. The current
day and month here are generated dynamically.
View by Month of - Allows the administrator to view any month of the
current month and up to five years in the past. After five years the data
remains but you loose ability to search those records.
Search Category – This allows the administrator to search on a
number of different searches by the following criteria:
1.
ID Number
2.
Email
3.
Name
4.
URL
5.
Phone
6.
Gender
7.
Age
8.
Address
9.
City
10.
State
11.
Country
12. Zip
You
may also combine any of the above search criteria and specify month and/or year
by using the “View by Month” search.
![]()
If you choose not to collect full demographic information you will
be limited to searching by email or id number.
Add Member

This
section allows you to add a single member at a time and all available
demographic data. If you accidentally type an improper e-mail address into the
form, ApplyLeads will notice and send you back to correct the problem.
![]()
It is the responsibility of the administrator to ensure all members
have opted into the list, and have readily available means for opting-out at
any time.
Add Multiple Members
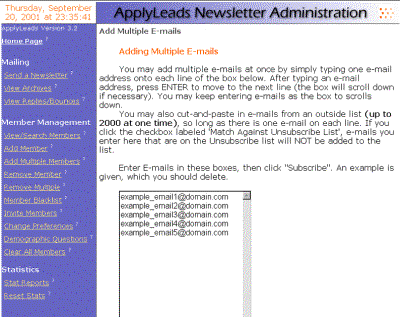
This section allows the
administrator to add multiple e-mails (up to 2000) at one time.
This feature in ApplyLeads is very
robust— while it is adding the e-mails, it is simultaneously checking the
following:
1.
Matches all emails against the each
other to ensure there are no duplicate emails within the list you are adding.
2.
Matches all emails against the
emails already in ApplyLeads to ensure none of the emails you are entering
already exist in the list.
3.
Defaults to checking the list you are adding against the
unsubscribe list to ensure you are not re-adding any members who have
previously requested to unsubscribe.
4. Counts to see that you are adding less than 2,000 emails
at one time.
This section
was created to alleviate any concerns that the list you are adding contains
duplicates, members who already exist or have unsubscribed.
Please be
patient. Once you click “Subscribe All”, the process of adding multiple members
may take from 1 minute to 30 minutes based on the speed of your server.
Before you submit your members you
should check the following:
1. All members
are added with a carriage return after the name just as it appears in the
example e-mails.
2. That you
have deleted the sample emails before you submit the list.
Matching Against Unsubscribe List
Check the box labeled “Match
Against Unsubscribe List” to have ApplyLeads automatically run your list past
the Unsubscribe list. Any e-mail addresses you have entered that appear on the
unsubscribe list will not be added to the list.
Getting a count of all e-mails
Check the box labeled “Get a count of e-mails” to
have ApplyLeads count the number of e-mail addresses in the field.
Remember, it is the responsibility of the
administrator to ensure all members have opted into the list.
Remove Members
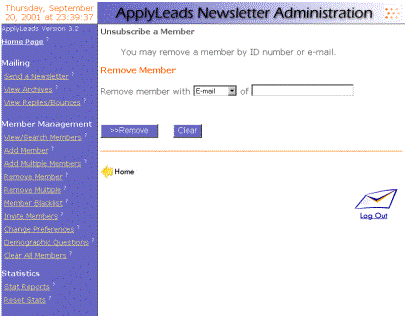
This
section allows you to remove a single member either by the ID number or email
address.
This
is necessary if your member ignores all self unsubscribe methods and contacts
ApplyLeads with a request to be removed.
Emails removed in this way are noted as “Removed by
Administator” in the unsubscribe section.
Remove Multiple
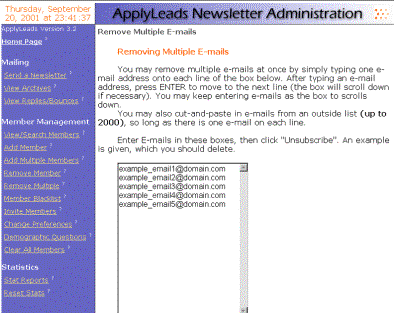
This
section allows you to remove up to 2,000 memebers at at one time, by email
address.
This
is necessary if many members ignores all self unsubscribe methods and contacts
ApplyLeads with requests to be removed.
Emails removed in this way are noted as “Removed by
Administator” in the unsubscribe section.
Member Blacklist
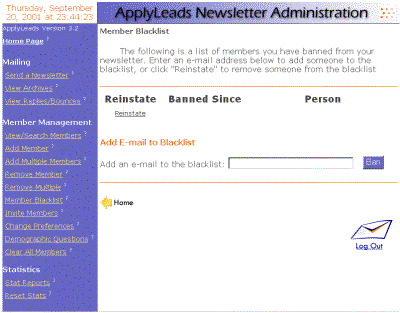
This
section allows the administrator to ban or blacklist an individual email from
entering the list. The banned emails are listed in order by date. If you later
wish to lift the restriction to your list you may reinstate the member.
This
feature does not effect members which currently exist in the list, this will only
prevent an email from being entered from after the time the administrator sets
the restriction.
![]()
![]()
Invite
Members
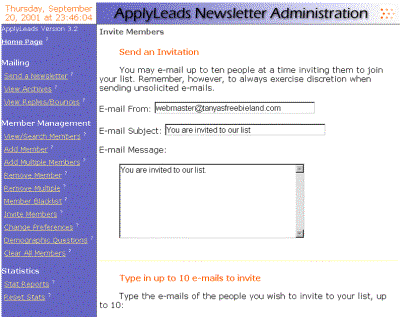
This
sections allows the user to compose an email and invite up to 10 friends at a
time to come and join the list.
![]()
It is the responsibility of the administrator to provide a proper
subject line and remove instructions sending invitations.
Change Preferences

The “Change Preferences” Section
allows the administrator to customize all aspects of ApplyLeads, from the email
layout to message delivery options. This
section should be completed before continuing on with ApplyLeads.
In this section, the administrator may
1. Set to send
email out as either plain text or html. In general, it is recommended you send
out e-mail as plain text, as this tends to look more professional and be
compatible with all e-mail clients.
2. Choose between
double opt (sends confirmation email which requires the member to confirm twice
before subscribing) in or single opt-in (requires no second confirmation from
member joining the list).
3. Set to
collect only emails or extended demographic questions ( actual questions must
be chosen at the “Demographic Questions” section).
4. Set what
your subscriber sees in the “Email From Field” .
5. Set default subject headings.
6. Set default footer text (the text that appears
before the body of your message).
7. Set default footer text (the text that appears
after the body of your text)
8. Customize unsubscribe instructions. This includes
any unsubscribe info, including the web page that you have put the unsubscribe
box on.
9. Decide whether you want the one-click unsubscribe
link to appear in the bottom of your emails. This allows your users to
unsubscribe with a single click.
10. Enter the
POP email to use with your list (Note. Due to the potential number of emails it
is highly recommended that you create a special email account , typically lists@yourdomain.com, for use with
ApplyLeads). This is the e-mail that the newsletter will be sent out from. It
should be a working e-mail box to receive replies, but it does not have to be.
Don’t confuse this with the administrator e-mail, which is your personal e-mail
address.
11. Set your administrator e-mail. This is the e-mail
that receives Sent Message Reports, test Newsletters, and other administrative
reports.
12. Set root directory, meaning the main web address of
your site. If your site is joesplace.com, this would be
“http://www.joesplace.com”.
13. Set root path, meaning the file path to your root
web directory. This is usually something like
“/usr/local/apache/users/home/yourname/yourdomain.com/www”.
14. (UNIX only) Set the sendmail path. Sendmail is a Unix program
that distrubes the e-mails out onto the network. Ask your network administrator
where Sendmail is located. It is almost always located at “usr/sbin/sendmail”
or “usr/lib/Sendmail”.
15. (Windows NT Only) Set the domain of your mail server. This usually
looks something like “http://mail.yourdomain.com” . Ask your network
administrator what the sub-domain of your mail server is.
If you have a problem with ApplyLeads in the
future, 95% of the time it will be because one or more of your preferences are
set incorrectly. If you have doubts they might be incorrect, contact us and we
will walk you through the process.
Demographic Questions
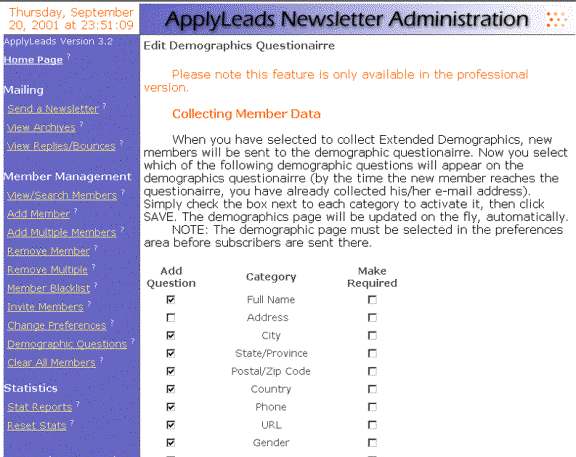
In
order to collect demographic questions you will need to select “Collect Full
Demographics" from the “Change Preferences” section.
After
you have selected to collect Extended Demographics, new members will be sent to
the demographic questionnaire. You may select which of the pre selected
demographic questions will appear on the demographics questionnaire (by the
time the new member reaches the questionnaire, you have already collected
his/her e-mail address). Simply check the box next to each category to activate
that demographic.
You
also have the ability to make any of the pre-selected demographic questions
required for your member to answer in order to subscribe. Once you have selected which demographics
you would like to ask and which questions are required click save.
The
demographics page will be updated automatically.
Currently ApplyLeads
supports the following pre-selected demographic questions:
Full
Name:
Address
City
State/Province
Postal/Zip
Code
Country
Phone
URL
Gender
Age
You
may request additional custom demographic questions by contacting us through
http://www.applytools.com
Clear All Members
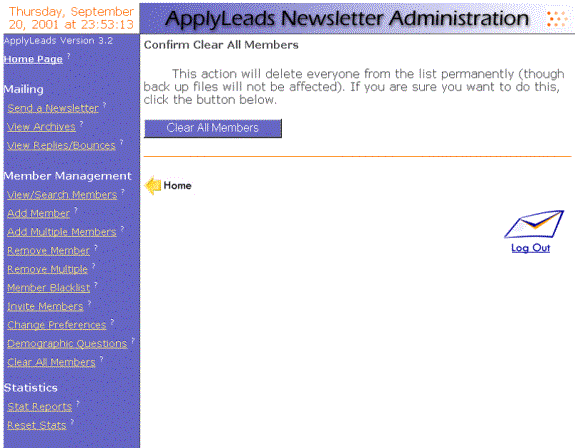
![]()
![]()
This
section will delete all members from
the list permanently (though back up files will not be affected).
![]()
It is highly recommended that you ALSO use the “Reset Stats” section
of Applyleads so that all of your statistics are reset as well as all your
members cleared.
Statistics
Stat Reports
In
this section the administrator may view statistics
pertaining to the members who have subscribed to the list. This includes:
total subscribers
net subscribers
total unsubscribers
attrition rate
If the administrator
decides to collect extended demographics in “Change preferences” and set which
questions to ask in demographic questions” the administrator also has access to
additional information about subscribers including:
-Email Domain
-Gender
-Web Site Affiliation
-Country
- Age
Reset Stats

![]()
This section will reset statistics
that might have been left over from deleted members, such as unsubscribe data.
This will only affect statistics for the current year.
Cut-And-Paste Code
Get Signup Page Code

This
is the section where you obtain the subscribe code to insert on the html pages
of your site. Simply find the place in
your code where you want the subscription box to appear, and insert the code.
You can place the code in as many pages as you'd like. The code seems rather
long because we've included code to ensure you get a valid, usable e-mail
address every time.
Once you've copied this text directly into your web page, the subscription box
will appear when the page is viewed in a browser. An example of the subscribe
box is located in this section.
![]()
To increase conversion is recommended that you place the subscribe
code on each page of your site.
Get Unsubscribe Code

This
is the section where you obtain the unsubscribe code to cut and paste into your
web page. When your members enter their e-mail here, they will be removed from
the list, and sent to your Farewell page.
Emails removed from this method are displayed as “Removed” in the
unsubscribe section of ApplyLeads. Simply find the place in your code where you
want the unsubscribe box to appear, and insert the code. The code seems rather
long because we've included code to ensure you get a valid, usable e-mail address
every time.
![]()
It is recommended that you create a special page for your
unsubscribe code so that users don’t become confused with the subscribe
box. Also you should include the path
to this page in your unsubscribe instructions in “Change Preferences”.
Data Management
Download Lists
This section allows the
administrator to download both the subscribe and unsubscribe lists. In this section you may download the
following files:
-Subscribed Members (e-mails only)
-Subscribed
Members (e-mails and demographics)
-Unsubscribed Members
The data is prepared
in a text file.
![]()
It is highly recommended that you periodically download both your
subscribe and unsubscribe lists so is need be you may import both lists in the
eventuality of data losss.
Export Data to Excel

This
section allows the administrator to export the subscribe list only to excel
format for easy manipulation and data analysis.
Simply
follow the instructions located on the page.
Import Data From File

This
section allows the administrator to automatically import e-mails in a few
seconds from a text file (in delimited format) into your e-mail list with a few
easy steps. Follow the instructions on
the page to import your data. This
function requires the use of an FTP client.
![]()
If
you'd like to import more than just e-mails from a text file, skip these steps,
and go to the section below named "Extended Demographics Import",
where you can send us the list to be manually imported.
Change Password
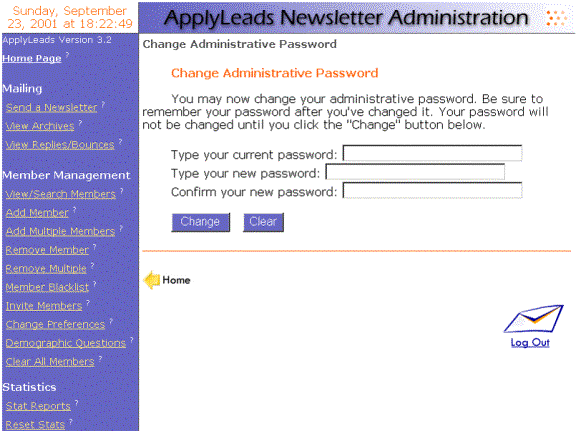
This section allows the administrator to change the
password to access ApplyLeads. You must
enter the previous password in order to complete this function.
Back Up Data
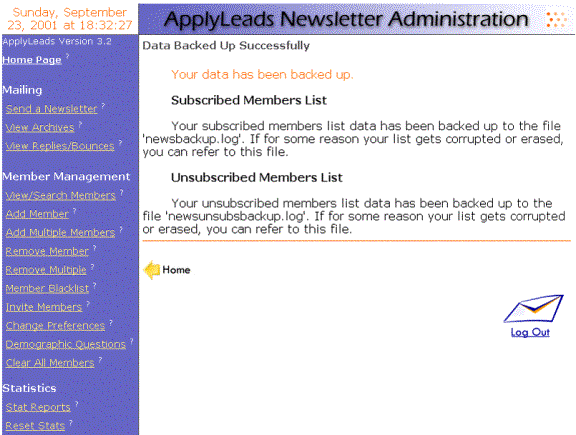
This
section allows the administrator to back up the data in ApplyLeads in order to
restore the data to that point at some later point in time if data lose should
occur.
![]()
It
is highly recommended that you back up data as often as possible.
This
section is very important for those who experience a problem and need to
restore their data. By using this feature, Applyleads will restore the system
to the point of the last moment in time which the administrator executed the
“Back Up File” function.
![]()
This
feature will restore the exact point at which you last saved your data so, if
you know that your data was corrupted at the last point of back up do not
restore.
Print This Page
This
allows you to print the current displayed page of ApplyLeads with a single
click. You may also enter your browser’s File menu and select Print….
This is just a quick method of printing the page.
![]()
![]()
Log Out

Clicking
on this link will take you to the log-out page. Click the “End Session”
button to log out.
Development
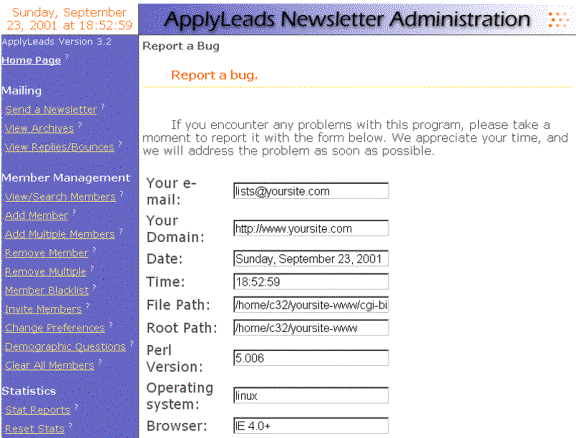
This
section allows all users to quickly and easily report a potential error with ![]()
the program. The form will automatically fill
in all the relevant information it can find about your computer set-up. This
information will help us diagnose your problem.
Please
be as explicit as possible when reporting bugs. Because of the complexity of
ApplyLeads, there can be any of several root causes for a problem that seems
simple, and we need as much information as possible to help determine the cause
of the problem.
Please
include the following information in any bug report:
1. What you were doing just before the bug occurred.
2. Describe the exact behavior of your computer during
the bug (e.g., did the screen go blank? Did the page only load halfway?). Was
there an error message? Any unusual behavior?
3. What you did to try to solve the problem (e.g., if
it wasn’t sending mail, did you check the correct path to sendmail?).
4. Whether you have had the problem before, or any
problems that might be related to this one.
In
other words, don’t say “The mail doesn’t work.” Instead, describe exactly what
happened as best you can, in order to help us fix the problem right away.
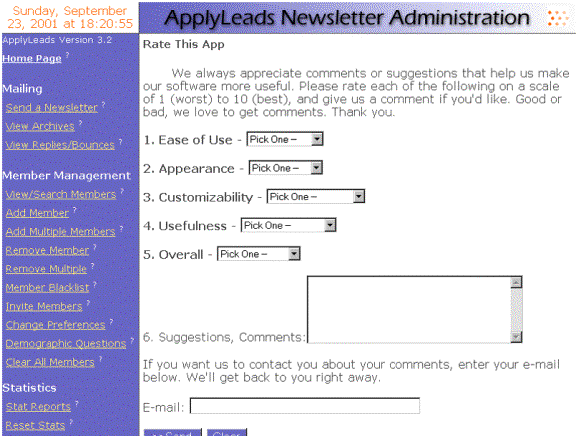
This
section allows the user to rate ApplyLeads and offer suggestions on possible
upgrades or enhancements to ApplyLeads.
All
your suggestions are reviewed, and greatly appreciated.
Technical
Support

![]()
If
you are using the free version of ApplyLeads, all technical support questions
must be submitted through the message board located at ApplyTools.com.
If
you have purchased the fully licensed professional edition, you may use the
contact form or call our technical support number located on the web site.
Developer Website
This
section contains a link to http://www.ApplyTools.com,
the manufacturer and developer of ApplyLeads v3.2. ApplyTools.com offers many
different web tools similar to ApplyLeads.
About ApplyLeads

This section contains version and copyright information about ApplyLeads.
ApplyLeads 3.2 Developers Notes
About
ApplyLeads
Applyleads v3.2 was
written in Perl 5.xx